手摸手写简易VueRouter3
背景&任务
大家好,这里是以身作则带头卷的梅利奥猪猪,这次很高兴能在劳动节产出一篇关于手写VueRouter3源码之hash模式水文,看完这篇文章后你将会收获源码级别手写简易Router3的能力(Vue2 使用的是 router3,vue3 才是 router4)
具体需要实现功能如下
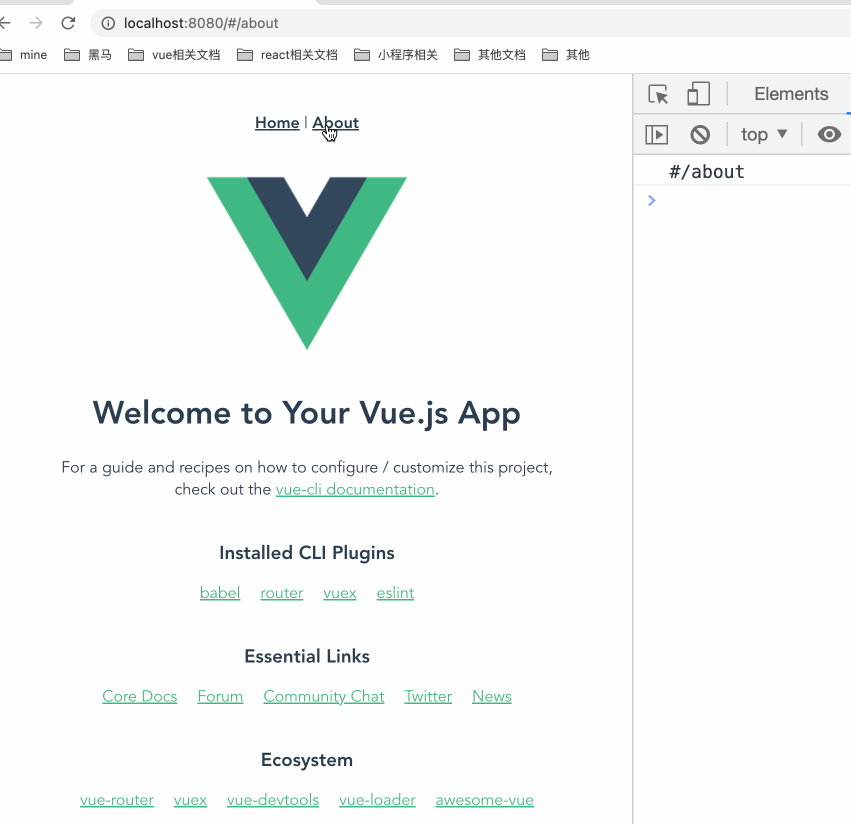
hash 模式点击 Home 和 About 可以切换
自己手写个 my-router,把原本
router/index.js的代码改成这样import VueRouter from 'vue-router'=>import VueRouter from './my-router.js'实现完成后能看到,和之前一样的脚手架搭的路由切换效果即可
23年05月10日更新嵌套路由实现
嵌套路由实现
- 实现完成后,可以看到二级路由(甚至三级路由...n级路由也能渲染)
其他功能暂时不写,剩下的功能有兴趣的小伙伴可以自行看源码补充
- history 模式也不写
- 还有第三个模式也不写
- 导航守卫也不写
嵌套路由也不写- .....
- 主打实现简易版(狗头保命)
具体细节知识如下
Vue.use- 插件机制之如何开发插件(默认你会了,迅速过)- 实例化VueRouter时传入的routes,源码里到底怎么用的,怎么映射关系的
main.js中实例化Vue时传入router,为什么要传呢(等价于源码里到底怎么用的)- render函数和h函数(默认小伙伴们会了,不会可以先看文档哈)
- 还有些细的这里就不列举了
是不是很激动!那我们准备开始吧
准备工作
首先先用脚手架 vue-cli 搭好项目,需要安装依赖 vue-router,等依赖装好启动项目后能看到效果那准备效果就 ok 了

开发走起
在router文件夹下新建my-router.js
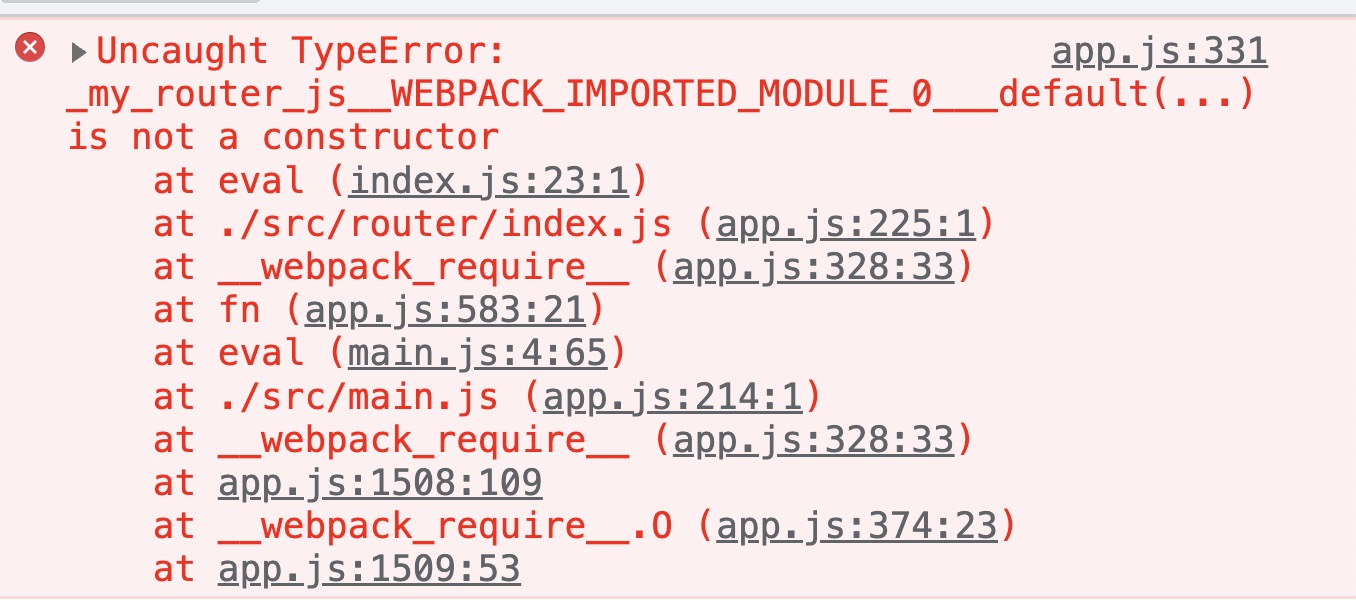
新建后,将原本router/index.js的代码改成这样import VueRouter from 'vue-router' => import VueRouter from './my-router.js'
import Vue from 'vue'
import VueRouter from './my-router.js' // 最终修改后就是这个样子哈
import HomeView from '../views/HomeView.vue'
....
import Vue from 'vue'
import VueRouter from './my-router.js' // 最终修改后就是这个样子哈
import HomeView from '../views/HomeView.vue'
....那在我们实现源码前,肯定是会有问题的,所以大家看到控制台的报错不要慌因为我们还没开始呢!
Vue 插件机制
众所周知, 不管我们用 VueRouter, 还是 Vuex, 还是 Element, 都会看到类似这样的代码
// 使用VueRouter插件
Vue.use(VueRouter);

// 使用Vuex插件
Vue.use(Vuex);

// 使用Element插件
Vue.use(Element);
// 使用VueRouter插件
Vue.use(VueRouter);
// 使用Vuex插件
Vue.use(Vuex);
// 使用Element插件
Vue.use(Element);如何开发个插件,官方文档中开发插件也有提到,简单来说就是要提供 install 方法,所以我们在my-router.js中,用类的写法,提供静态方法 install,最后记得默认导出 VueRouter
class VueRouter {
  static install(Vue) {}
}
export default VueRouter;
class VueRouter {
static install(Vue) {}
}
export default VueRouter;此时我们的报错已经变了,那我们这一趴如何开发插件就已经结束了
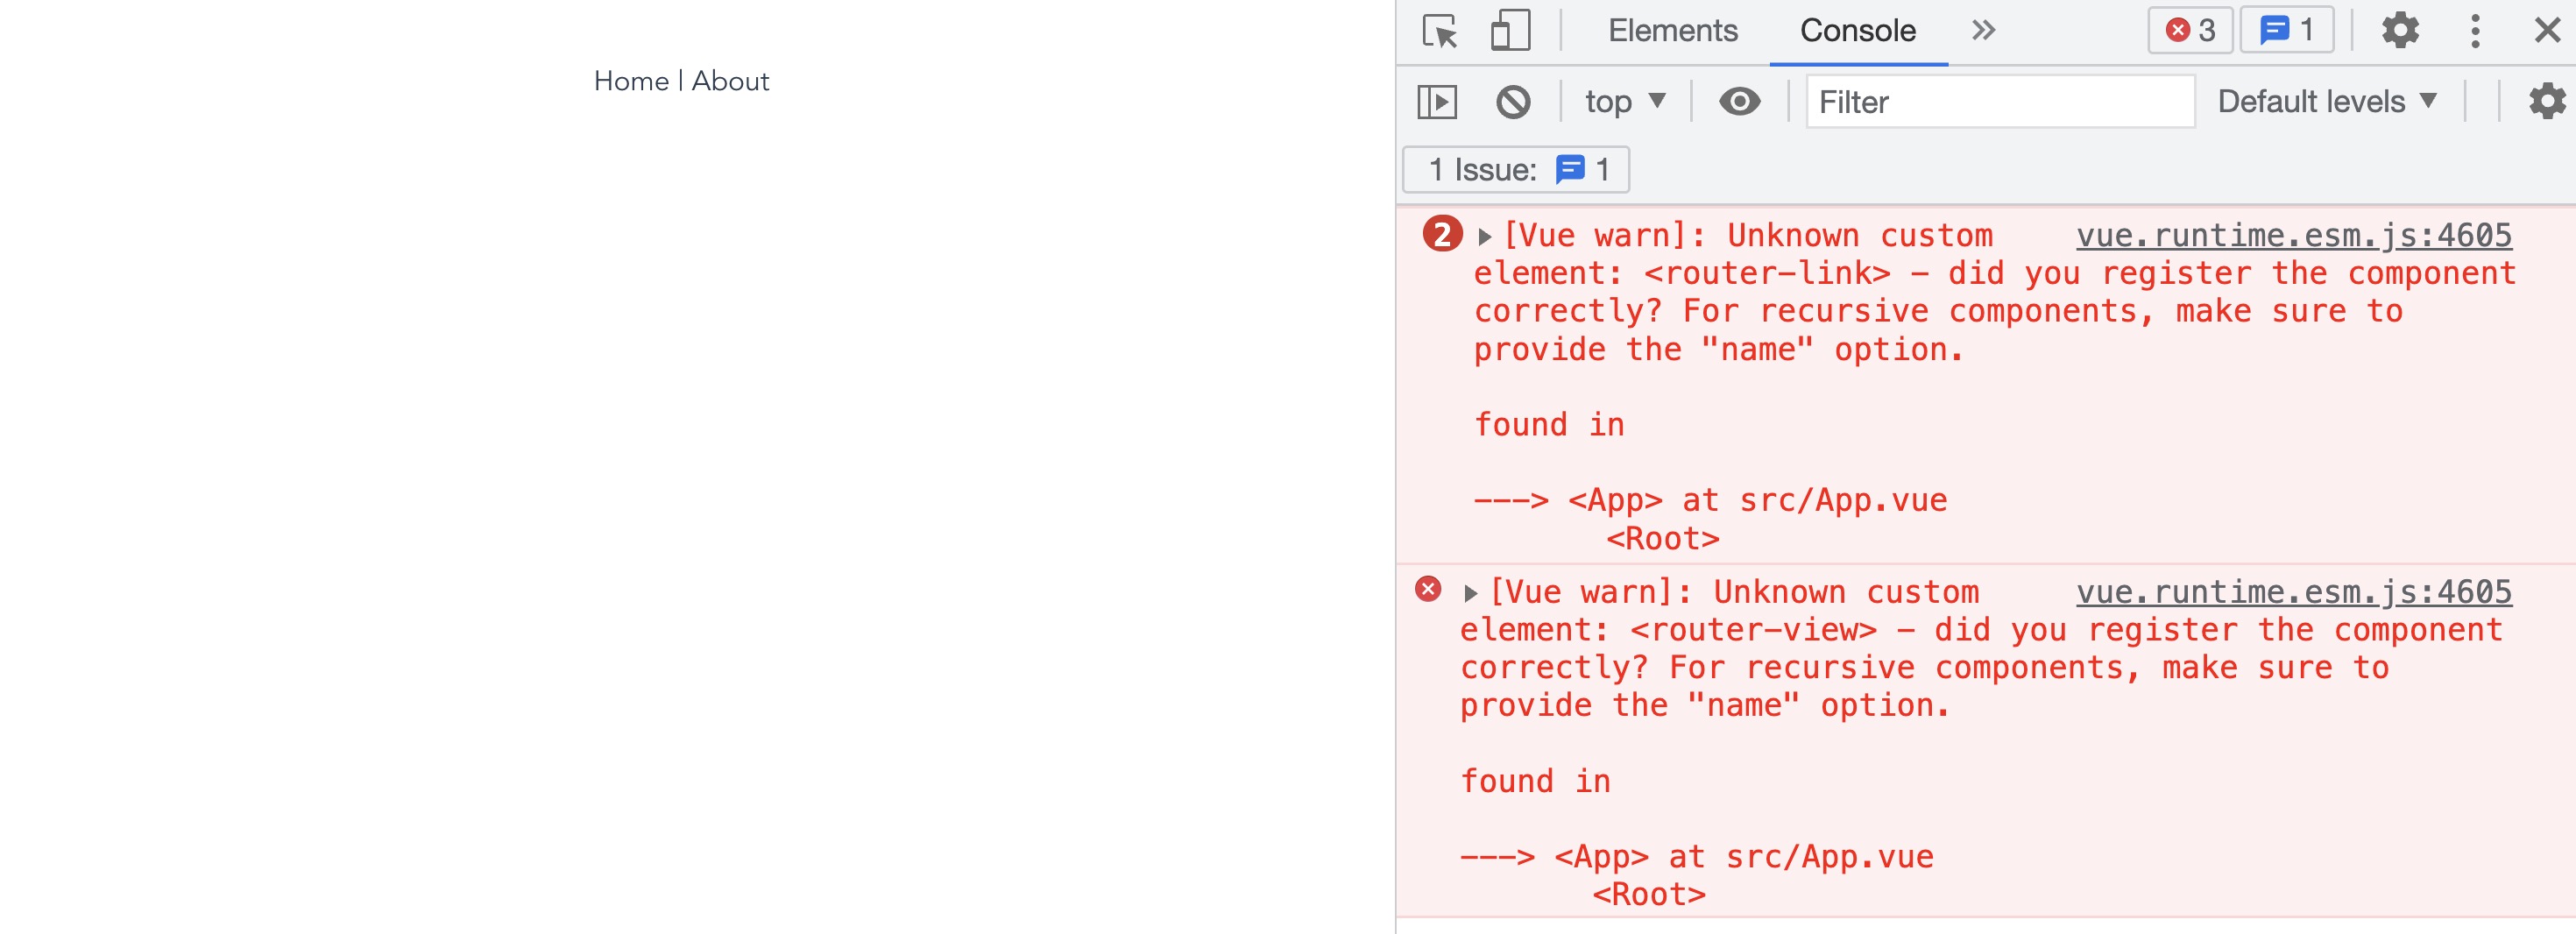
全局注册组件
上一趴中,报错很明显,控制台告诉我们,组件并没有注册!我们印象中使用 VueRouter 的时候是不是有两个全局组件,一个router-link,一个是router-view,所以我们要在开发插件的时候全局注册他们
class VueRouter {
  static install(Vue) {
    // 以下两行代码新增
    Vue.component("router-link", {});
    Vue.component("router-view", {});
  }
}
export default VueRouter;
class VueRouter {
static install(Vue) {
// 以下两行代码新增
Vue.component("router-link", {});
Vue.component("router-view", {});
}
}
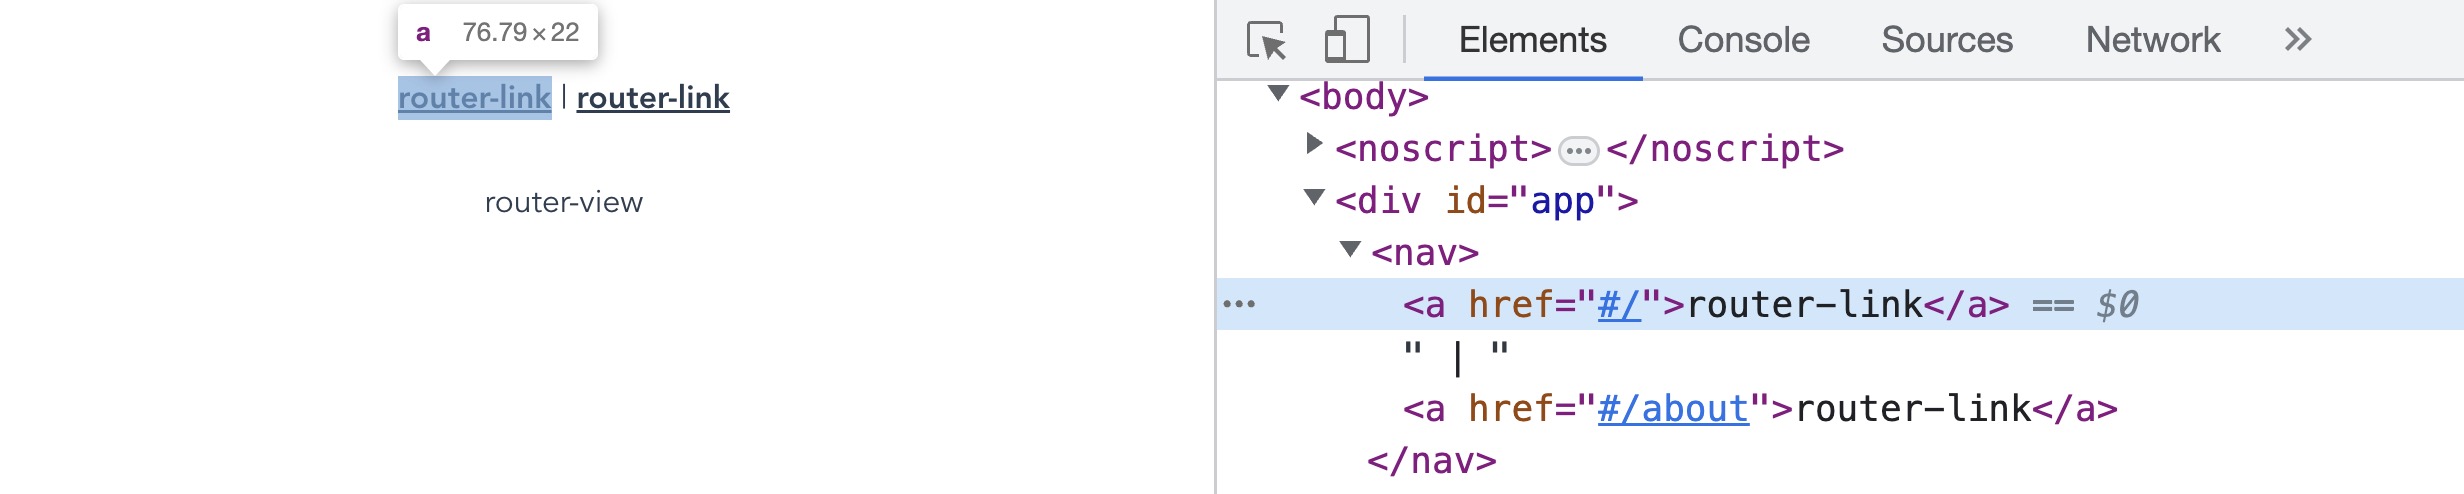
export default VueRouter;然后我们又看到了不一样的报错!不要慌,问题很大,我们慢慢处理, 先来看图
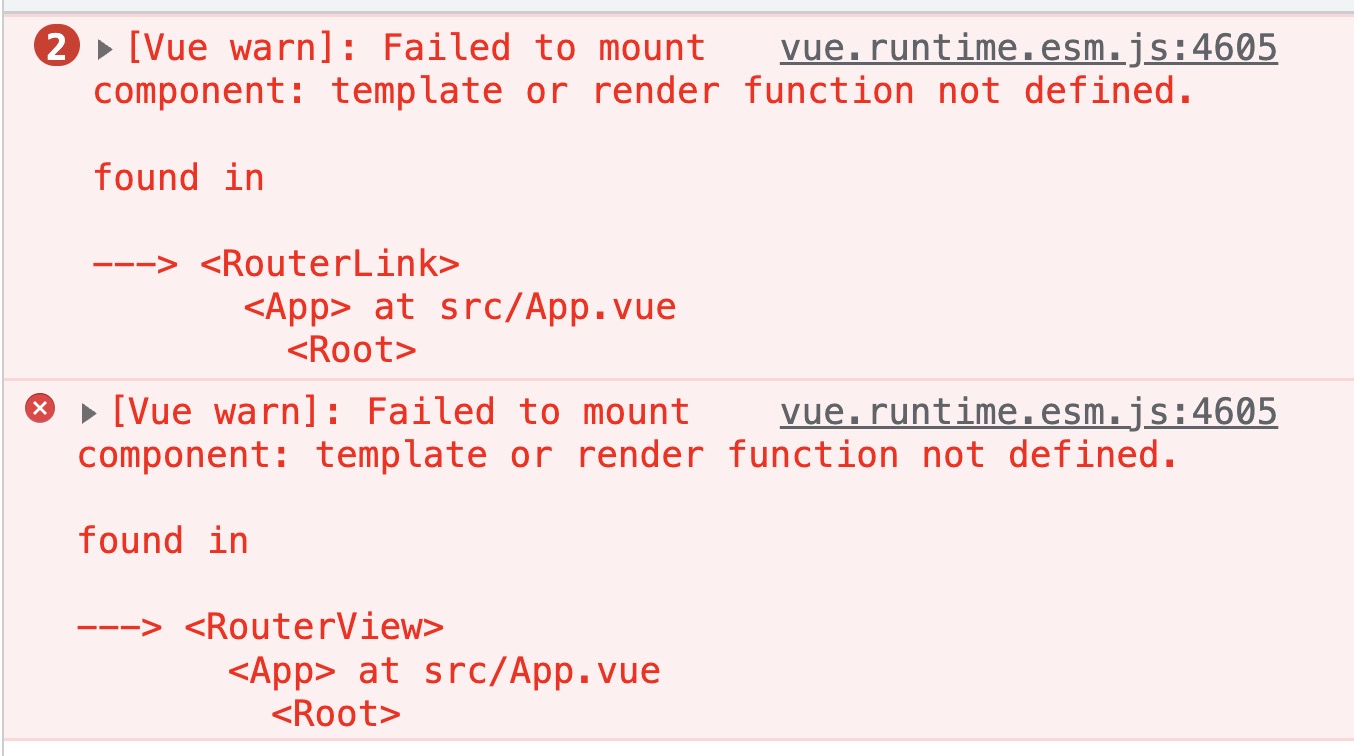
题外话,知道第一个错为什么报了 2 次吗,因为 router-link 使用了两次呀,Home和About两个router-link呀!那接下去就根据他的错误提示一步一步来
template 或 render 处理
前面的报错,他提示 template 或 render 没有定义,那我们先加个 template 试试
class VueRouter {
  static install(Vue) {
    Vue.component("router-link", {
      template: '<a href="#">router-link</a>',
    });
    Vue.component("router-view", {
      template: "<div>router-view</div>",
    });
  }
}
export default VueRouter;
class VueRouter {
static install(Vue) {
Vue.component("router-link", {
template: '<a href="#">router-link</a>',
});
Vue.component("router-view", {
template: "<div>router-view</div>",
});
}
}
export default VueRouter;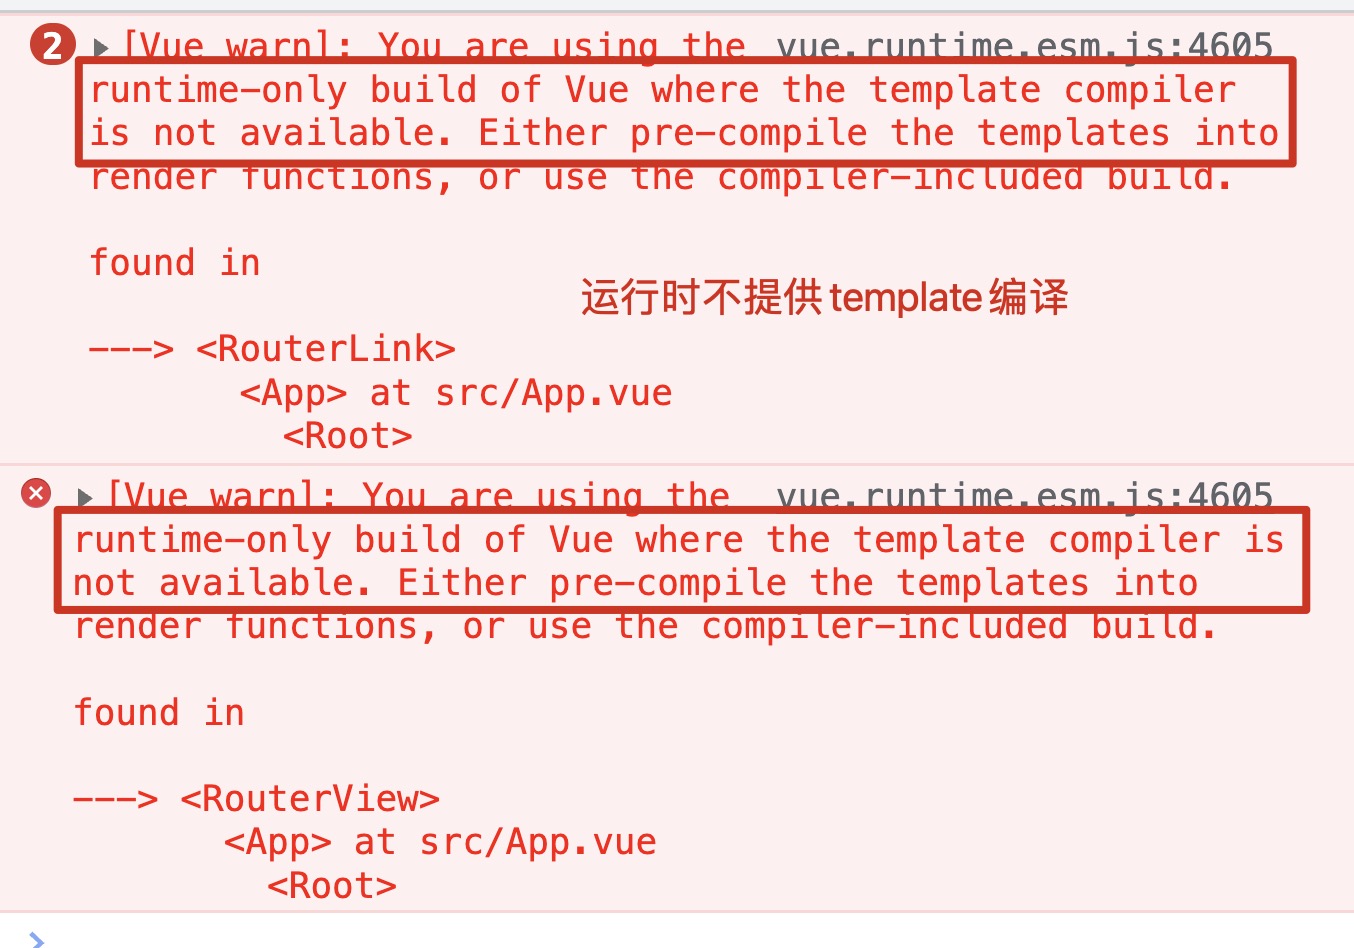
其实大家不知道有没有见到过vue.js,vue.runtime.js,这两者区别是什么,前者是带编译器的,后者是运行时不带编译器的,我们本质上 template 最终都会转换为 render 函数,所以 在这里 template 的方案走不通,此时就可以使用 render 的方案
class VueRouter {
  static install(Vue) {
    Vue.component("router-link", {
      //   template: '<a href="#">router-link</a>'
      // 改写为render函数
      render(h) {
        // 写死a,内容是router-link
        return h("a", "router-link");
      },
    });
    Vue.component("router-view", {
      //   template: '<div>router-view</div>'
      // 改写为render函数
      render(h) {
        // 写死div,内容是router-view
        return h("div", "router-view");
      },
    });
  }
}
export default VueRouter;
class VueRouter {
static install(Vue) {
Vue.component("router-link", {
// template: '<a href="#">router-link</a>'
// 改写为render函数
render(h) {
// 写死a,内容是router-link
return h("a", "router-link");
},
});
Vue.component("router-view", {
// template: '<div>router-view</div>'
// 改写为render函数
render(h) {
// 写死div,内容是router-view
return h("div", "router-view");
},
});
}
}
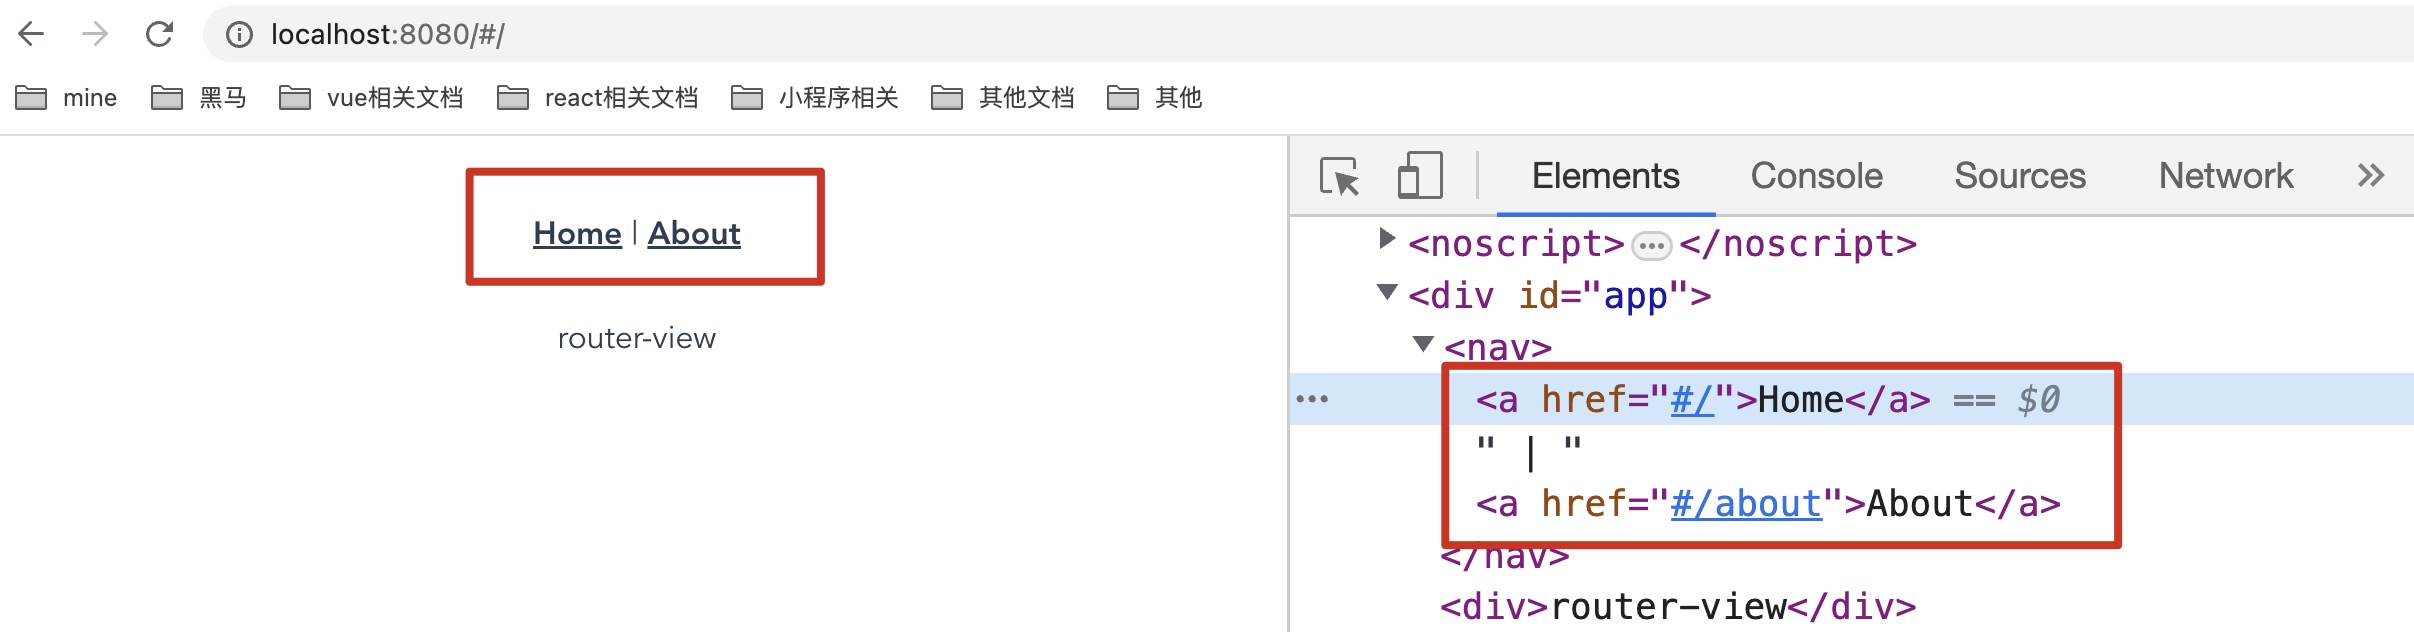
export default VueRouter;注意看,奇迹出现了,没有任何报错,东西显示出来了,我们离成功又近了一步,虽然内容都是写死的

router-link 组件处理
前面我们已经跑通了个写死的例子,但显示这个不是我们要的,想下我们具体 router-link 的用法,是不是这个样子的
<router-link to="/about">About</router-link><router-link to="/about">About</router-link>其中 to 属性不就是我们的父传子嘛!About 标签内的内容不就是默认插槽嘛!搞起
父传子 to 属性处理
XDM大声告诉我,如何父传子,不就是 props 搞起!唯一不太熟悉的可能就是 h 函数中如何给 a 标签设置属性,其实就是配置第二个参数
Vue.component("router-link", {
  //   template: '<a href="#">router-link</a>',
  props: {
    to: String, // 父传子
  },
  render(h) {
    return h(
      "a",
      {
        // 语法是这样用的话 attrs具体可以看文档
        attrs: {
          // 因为是hash模式拼接个#
          href: "#" + this.to,
        },
      },
      "router-link"
    );
  },
});Vue.component("router-link", {
// template: '<a href="#">router-link</a>',
props: {
to: String, // 父传子
},
render(h) {
return h(
"a",
{
// 语法是这样用的话 attrs具体可以看文档
attrs: {
// 因为是hash模式拼接个#
href: "#" + this.to,
},
},
"router-link"
);
},
});
默认插槽处理
到这里,我们已经把对应的组件渲染也做好了,to 属性也处理好了,还差一个,那就是默认插槽,这个该怎么办呢!这个时候可以使用this.$slots.default,通过这个,可以获取传入的默认插槽
Vue.component("router-link", {
  //   template: '<a href="#">router-link</a>',
  props: {
    to: String,
  },
  render(h) {
    return h(
      "a",
      {
        attrs: {
          // 因为是hash模式拼接个#
          href: "#" + this.to,
        },
      },
      // 第三个参数传入默认插槽
      this.$slots.default
    );
  },
});Vue.component("router-link", {
// template: '<a href="#">router-link</a>',
props: {
to: String,
},
render(h) {
return h(
"a",
{
attrs: {
// 因为是hash模式拼接个#
href: "#" + this.to,
},
},
// 第三个参数传入默认插槽
this.$slots.default
);
},
});此时,注意看,默认的内容是不是就出现了!至此我们的全局组件router-link就完成了
router-view 组件处理
对 h 函数的额外小补充
不知道大家知不知道(就算不知道也没事这次就知道了),h 函数第一个参数除了传 tag,还可以传组件!纳尼!那我们就测试看看 Home 组件能不能传入并渲染出来
// 导入视图组件
import HomeView from '../views/HomeView.vue'
class VueRouter {
  ...
    Vue.component('router-view', {
    //   template: '<div>router-view</div>'
      render (h) {
        // return h('div', 'router-view')
        // 测试第一个参数传入组件
        return h(HomeView)
      }
    })
  }
}
export default VueRouter
// 导入视图组件
import HomeView from '../views/HomeView.vue'
class VueRouter {
...
Vue.component('router-view', {
// template: '<div>router-view</div>'
render (h) {
// return h('div', 'router-view')
// 测试第一个参数传入组件
return h(HomeView)
}
})
}
}
export default VueRouter然后就这样直接就能看到效果了

那我们这里该写死Home吗,显然不对吧,这里应该要根据我们之后 hash 的变化,显示对应的页面组件,那这就是我们之后的目标!
实例化 VueRouter 传入的 routes 起手这样开发
接下去如何根据对应的 url 找到对应的页面组件呢!还记不记得我们在实例化的时候,传入了routes,所以我们可以在构造函数里这样处理
  constructor (options) {
    // 接收options,里面有routes参数,不信打印下看看?=v=
    this.options = options
    console.log('options', options)
  }
constructor (options) {
// 接收options,里面有routes参数,不信打印下看看?=v=
this.options = options
console.log('options', options)
}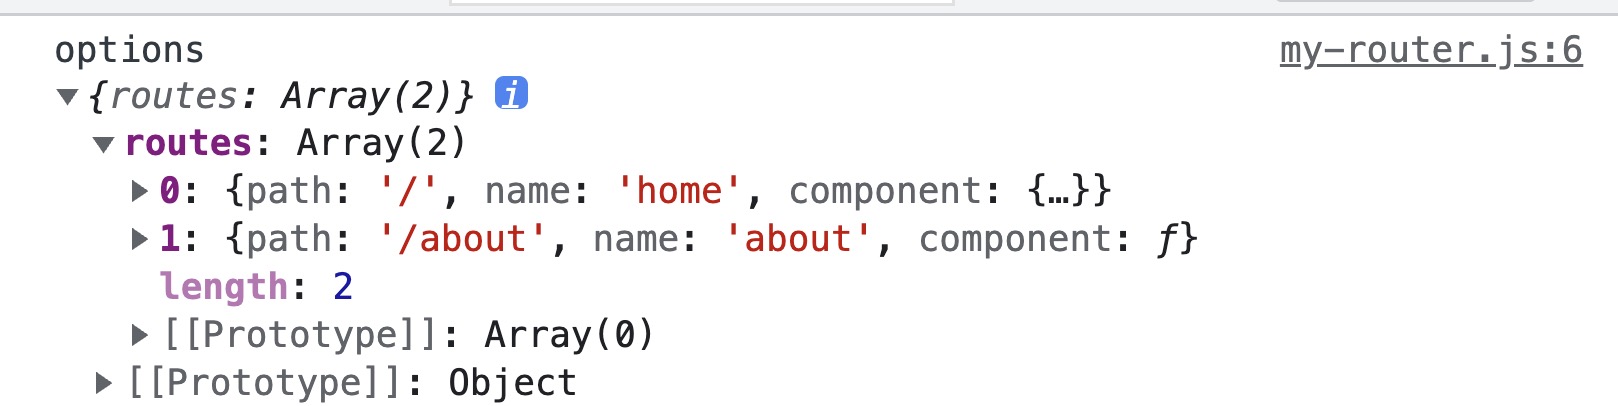
可以,那routes就暂时先这么处理
监听 hashchange 处理逻辑
那接下去我们在构造函数里,直接监听下 hashchange 变化
  constructor (options) {
    // 接收options,里面有routes参数,不信打印下看看?=v=
    this.options = options
    // console.log('options', options)
    window.addEventListener('hashchange', () => {
      const hash = window.location.hash
      console.log(hash)
    })
  }
constructor (options) {
// 接收options,里面有routes参数,不信打印下看看?=v=
this.options = options
// console.log('options', options)
window.addEventListener('hashchange', () => {
const hash = window.location.hash
console.log(hash)
})
}
细心的小伙伴肯定发现了个事!打印的内容最前面是有#的对吧,所以我们之后用成员变量接收的时候可以处理下这个细节,这样之后和我们路由规则path去做匹配会方便很多
this.current = "/";
window.addEventListener("hashchange", () => {
  const hash = window.location.hash;
  // console.log(hash)
  // 把第一个#干掉,只拿#后面的
  this.current = hash.slice(1);
});this.current = "/";
window.addEventListener("hashchange", () => {
const hash = window.location.hash;
// console.log(hash)
// 把第一个#干掉,只拿#后面的
this.current = hash.slice(1);
});$router 的处理
小伙伴们,到这里可能你们就有点诧异了,怎么突然间开始整$router了!其实不难理解,因为我们的current大家看是写在哪里的,是不是VueRouter实例上有这个属性啊,那我们最终render的时候不就是根据current去找对应的页面组件吗,所以我们要在render里拿到this.$router
那this.$router怎么来呢!众所周知,这无非就是把VueRouter的实例,放在Vue的原型上所以在install中,我们最终的实现必然是Vue.prototype.$router = VueRouter 实例, 但问题又来了,router 实例怎么来的呢!我们来看下 main.js 里的代码
// main.js
import Vue from "vue";
import App from "./App.vue";
// 请问这个是什么,这个不就是router实例!在这个里面实现会有Vue.use使用插件
import router from "./router";

Vue.config.productionTip = false;

new Vue({
  // 这里实例化的是App根组件,在这个时候传入了router实例,为什么要传呢答案马上知道了
  router,
  render: (h) => h(App),
}).$mount("#app");
// main.js
import Vue from "vue";
import App from "./App.vue";
// 请问这个是什么,这个不就是router实例!在这个里面实现会有Vue.use使用插件
import router from "./router";
Vue.config.productionTip = false;
new Vue({
// 这里实例化的是App根组件,在这个时候传入了router实例,为什么要传呢答案马上知道了
router,
render: (h) => h(App),
}).$mount("#app");看了以上代码,有没有发现我们实例化了没有!有!就在 main.js 里,实例化后为什么要传到 new Vue 里面,因为我们就是要获取这个实例挂载到原型上!
但这个 router 实例,是在 App 组件实例化的时候传入的,怎么去拿!
在使用VueRouter的时候我们代码是这样的
import VueRouter from './my-router.js'
Vue.use(VueRouter) // 会先执行使用插件,也就是先执行install方法

const router = new VueRouter(...) // 在做实例化VueRouter 才有router实例
import VueRouter from './my-router.js'
Vue.use(VueRouter) // 会先执行使用插件,也就是先执行install方法
const router = new VueRouter(...) // 在做实例化VueRouter 才有router实例也就是router实例要在之后才能拿到,这是怎么办到的呢!
参考源码的话你会发现,太巧妙了,简易实现是这样的
  static install (Vue) {
    // 混入语法,生命周期,先new Vue实例化,接下去会走到beforeCreate
    Vue.mixin({
      beforeCreate () {
        // 这里,只有根组件才能拿到router实例
        console.log(this.$options.router)
      }
    })
    ...
  }
static install (Vue) {
// 混入语法,生命周期,先new Vue实例化,接下去会走到beforeCreate
Vue.mixin({
beforeCreate () {
// 这里,只有根组件才能拿到router实例
console.log(this.$options.router)
}
})
...
}眼见为实看下效果,只有根组件才能拿到这个 router
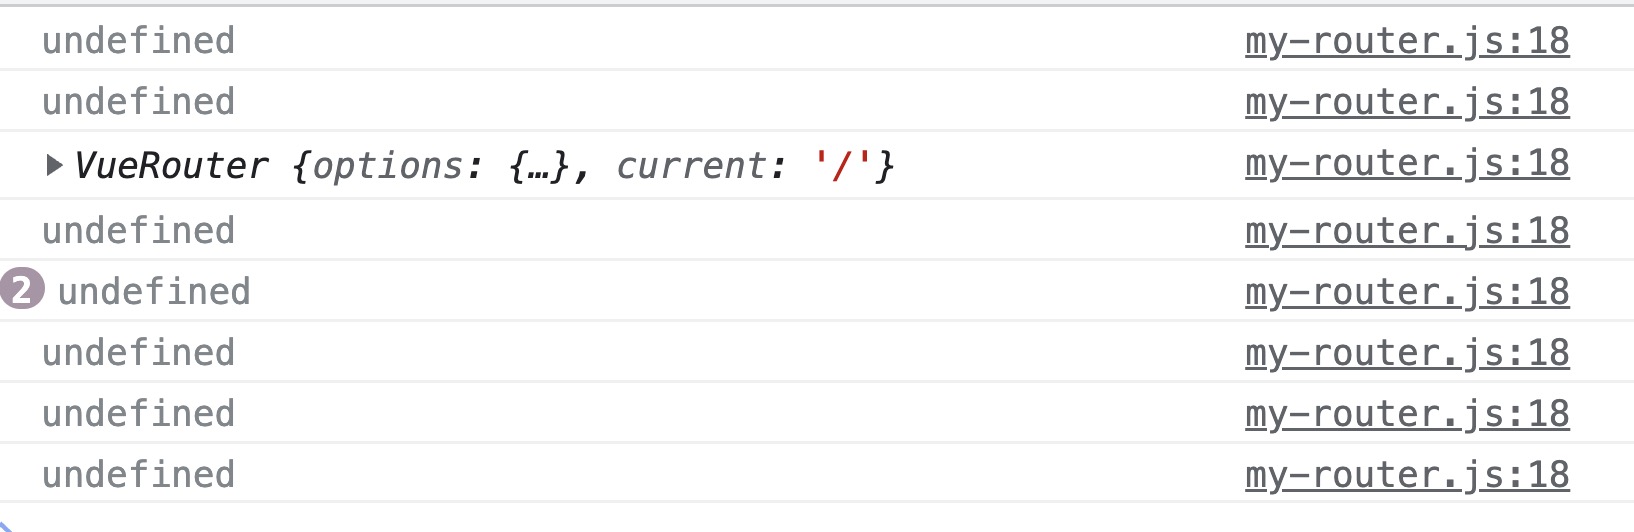
那接下去,实例都可以拿到了,不就简单挂载原型上就可以了,代码如下
      beforeCreate () {
        if (this.$options.router) {
          // 仔细想下,这个if就会进一次,那就是根组件才会处理,源码设计太巧妙了
          Vue.prototype.$router = this.$options.router
        }
      }
beforeCreate () {
if (this.$options.router) {
// 仔细想下,这个if就会进一次,那就是根组件才会处理,源码设计太巧妙了
Vue.prototype.$router = this.$options.router
}
}在 render 函数打印打印 current
接下去,我们$router 也处理好了,实例上不是有 current 吗,只要他变化了,对应的 render 希望能重新执行,那我们先在 render 的时候打印下 current 试试
Vue.component("router-view", {
  //   template: '<div>router-view</div>'
  render(h) {
    // return h('div', 'router-view')
    console.log("render中current打印", this.$router.current); // 打印current
    // 测试第一个参数传入组件
    return h(HomeView);
  },
});Vue.component("router-view", {
// template: '<div>router-view</div>'
render(h) {
// return h('div', 'router-view')
console.log("render中current打印", this.$router.current); // 打印current
// 测试第一个参数传入组件
return h(HomeView);
},
});
除了第一次 render 打印了 current,后面不管怎么 hashchange 触发,都不会重新执行 render,这个是为什么呢!真相只有一个,因为 current 不是响应式的!
响应式处理 current
说到响应式处理 current,大家第一反应是啥?先说两个错误示范
- Vue.set - 不能使用这个,因为 set 的语法第一个参数本身就要是响应式的对象
- Object.defineProperty - 不能用这个,因为这个只是数据劫持,响应式的功能还要自己实现,依赖收集等等
拿到大 Vue
说了这么多,都不能用,那怎么办呢!此时我们要借助 Vue 提供的方法!首先在构造函数里如何拿到大 Vue,这个可以这么操作下,三行代码就能搞定
// 声明个变量
let _Vue
class VueRouter {
  constructor (options) {
    ...
    // 在install的时候处理过了所以可以拿到_Vue,实例化VueRouter在install之后执行
    console.log(_Vue)
    ...
  }

  static install (Vue) {
    // install的时候给_Vue赋值,注意哈在我们使用插件的时候install先执行
    _Vue = Vue
    ...
  }
}
export default VueRouter
// 声明个变量
let _Vue
class VueRouter {
constructor (options) {
...
// 在install的时候处理过了所以可以拿到_Vue,实例化VueRouter在install之后执行
console.log(_Vue)
...
}
static install (Vue) {
// install的时候给_Vue赋值,注意哈在我们使用插件的时候install先执行
_Vue = Vue
...
}
}
export default VueRouter
实现响应式
接下去我们来看下 Vue 中提供的响应式方法,先来打印看下
      constructor (options) {
    // 接收options,里面有routes参数,不信打印下看看?=v=
    this.options = options
    // console.log('options', options)
    // ++++++++++++++++
    console.log(_Vue.util.defineReactive)
    this.current = '/'
    window.addEventListener('hashchange', () => {
      const hash = window.location.hash
      console.log(hash)
      this.current = hash.slice(1)
    })
  }
constructor (options) {
// 接收options,里面有routes参数,不信打印下看看?=v=
this.options = options
// console.log('options', options)
// ++++++++++++++++
console.log(_Vue.util.defineReactive)
this.current = '/'
window.addEventListener('hashchange', () => {
const hash = window.location.hash
console.log(hash)
this.current = hash.slice(1)
})
}
就是这个方法!接着就可以把this.current = '/'改写下,在接着测试下响应式的功能,主要看 current 改变后是否可以触发 render 函数
_Vue.util.defineReactive(this, "current", window.location.hash.slice(1) || "/");_Vue.util.defineReactive(this, "current", window.location.hash.slice(1) || "/");
如上图所示,响应式这不就完成了吗!之后只要在 render 中,处理好找到对应的组件渲染逻辑就大功告成了
router-view 中 render 函数的处理
总算到了最后一个步骤,前面的响应式处理已经可以让我们每次改变 current,render 函数就能重新执行,接下去就是要处理映射关系!我们都知道,在 options 中有 routes 字段,这个是我们实例化 VueRouter 时传入的,他是个数组,里面每一项都是路由规则对象,这个对象的规则如下
{
  path: '/xxx',
  component: 对应的组件
}
{
path: '/xxx',
component: 对应的组件
}如今我们也能拿到对应的 current,数组里找到对应的一项,在取 component 字段不是分分钟吗,所以可以这样实现
render (h) {
  // return h('div', 'router-view')
  // 测试第一个参数传入组件
  // console.log('render中current打印', this.$router.current) // 打印current
  let component = null
  // 这个是传入的routes规则
  const routes = this.$router.options.routes
  // console.log(routes, this.$router.current)
  // 数组里找到对应的那个route规则
  const route = routes.find(route => route.path === this.$router.current)
  if (route) {
    // 如果存在给component赋值
    component = route.component
  }
  // 最后渲染对应的组件
  return h(component)
}
render (h) {
// return h('div', 'router-view')
// 测试第一个参数传入组件
// console.log('render中current打印', this.$router.current) // 打印current
let component = null
// 这个是传入的routes规则
const routes = this.$router.options.routes
// console.log(routes, this.$router.current)
// 数组里找到对应的那个route规则
const route = routes.find(route => route.path === this.$router.current)
if (route) {
// 如果存在给component赋值
component = route.component
}
// 最后渲染对应的组件
return h(component)
}
这样我们就完成了个简易版的vue-router,虽然还有很多功能没做,但一个基本的hash模式的切换路由原理就是这样
嵌套路由实现走起
演示当前代码嵌套路由是会报错的
之前带着小伙伴们实现了个简单的hash路由,但是嵌套相关的逻辑没有写,如果直接现在处理二级路由,我们看下会有什么问题,首先router/index.js编写二级路由代码提供children字段
  {
    path: '/about',
    name: 'about',
    // route level code-splitting
    // this generates a separate chunk (about.[hash].js) for this route
    // which is lazy-loaded when the route is visited.
    component: () => import(/* webpackChunkName: "about" */ '../views/AboutView.vue'),
    // 新加内容为 加了children配置了规则
    children: [
      {
        path: '/about/info',
        component: {
          render (h) {
            return h('h1', 'About Info页面')
          }
        }
      }
    ]
  }
{
path: '/about',
name: 'about',
// route level code-splitting
// this generates a separate chunk (about.[hash].js) for this route
// which is lazy-loaded when the route is visited.
component: () => import(/* webpackChunkName: "about" */ '../views/AboutView.vue'),
// 新加内容为 加了children配置了规则
children: [
{
path: '/about/info',
component: {
render (h) {
return h('h1', 'About Info页面')
}
}
}
]
}注意了不要忘记配置二级路由出口,二级路由出口应该写在AboutView.vue
<template>
  <div class="about">
    <h1>This is an about page</h1>
    <!-- 新写的二级路由出口 -->
    <router-view></router-view>
  </div>
</template><template>
<div class="about">
<h1>This is an about page</h1>
<!-- 新写的二级路由出口 -->
<router-view></router-view>
</div>
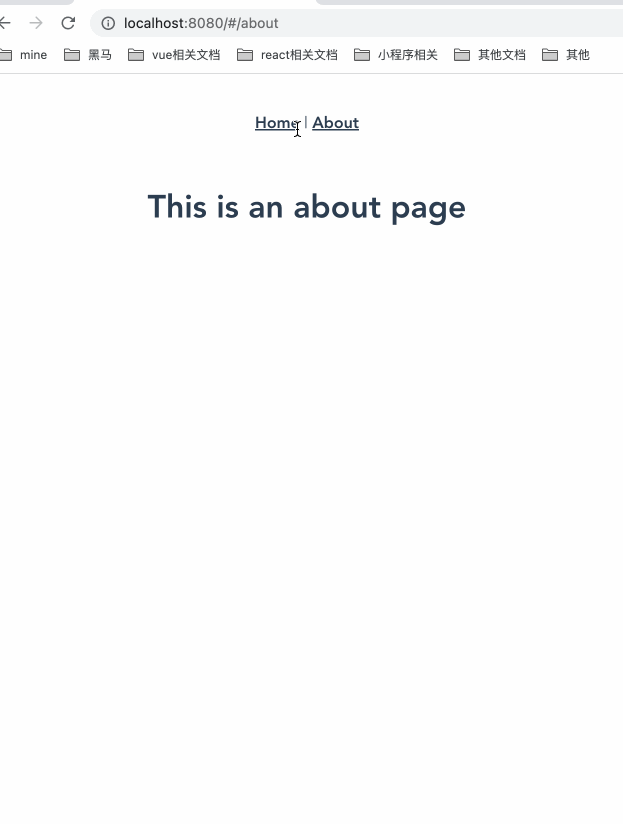
</template>我们还没有实现嵌套路由,那大家猜下访问/about会不会报错呢

一看竟然报错了!那为什么会报错的,聪明老铁们是不是一下子就想到了,因为在访问/about的时候渲染了我们的About页面组件,该组件里有用了router-view,此时about页面里面二级路由出口router-view,又会去执行render函数导致了栈溢出
说明访问二级路由不会报错的原因
接下去我们先访问下路径/about/info,但是访问的时候,发现竟然又没有报错了这个是为什么呢?我们打印一段代码即可知道答案
      render (h) {
        let component = null
        const routes = this.$router.options.routes
        // 新增打印
        console.log({ routes, current: this.$router.current })
        const route = routes.find(route => route.path === this.$router.current)
        if (route) {
          component = route.component
        }
        // 新增打印
        console.log({ route, component })
        return h(component)
      }
render (h) {
let component = null
const routes = this.$router.options.routes
// 新增打印
console.log({ routes, current: this.$router.current })
const route = routes.find(route => route.path === this.$router.current)
if (route) {
component = route.component
}
// 新增打印
console.log({ route, component })
return h(component)
}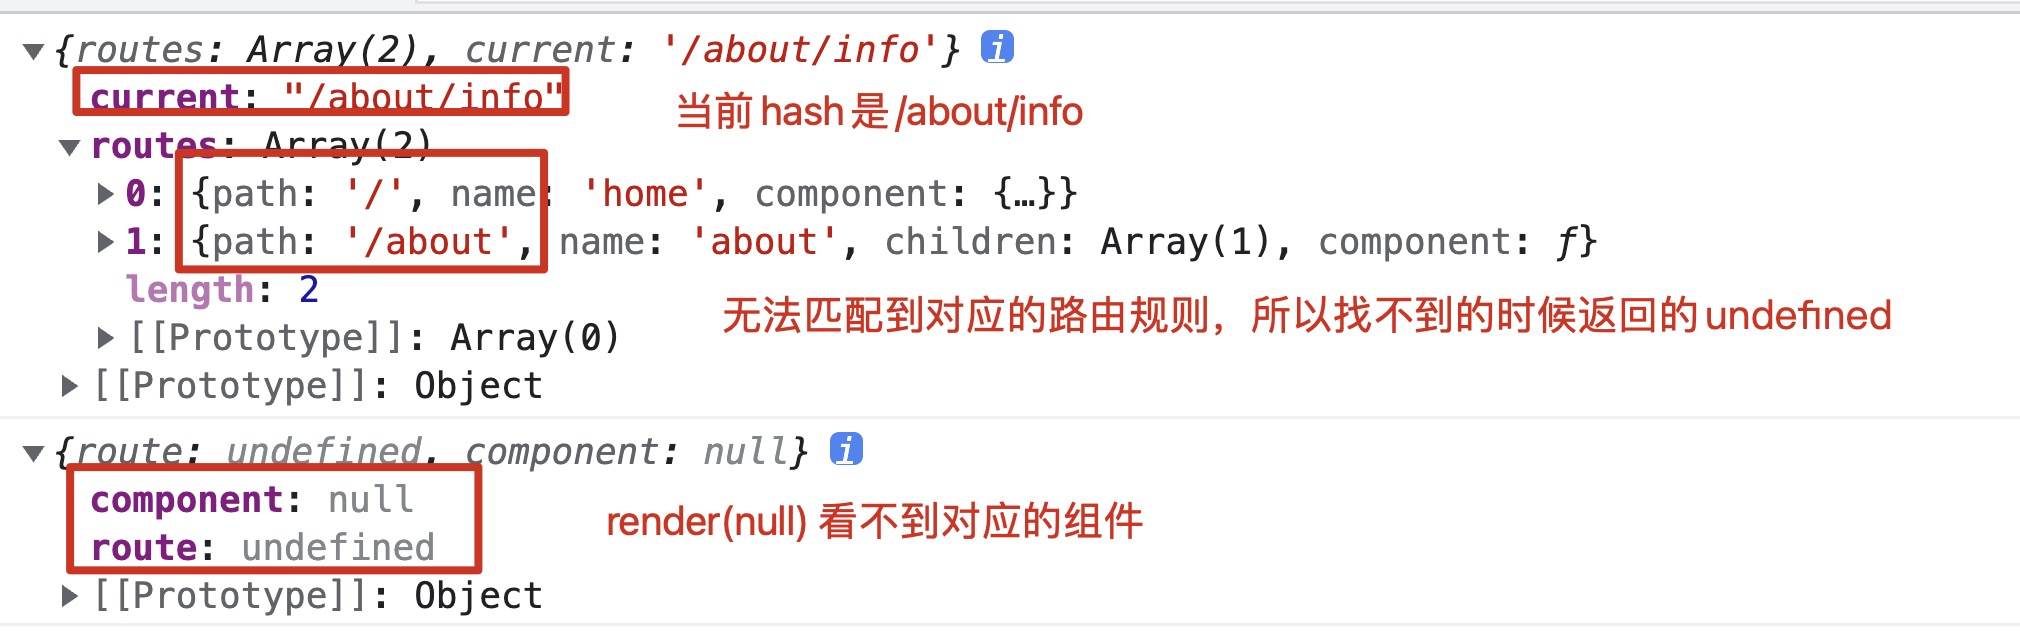
上述代码说明,路由规则没有匹配到,所以没有渲染对应的组件,render(null)不会报错
研究源码核心代码分析逻辑
源码中核心的思路是标记深度,并且matched匹配对应的路由规则
  render (_, { props, children, parent, data }) {
    // 标记我是一个routerView组件
    data.routerView = true
    ...
    // 标记深度
    let depth = 0
    ...
    // 循环,一直往上找,直到头
    while (parent && parent._routerRoot !== parent) {
      const vnodeData = parent.$vnode ? parent.$vnode.data : {}
      if (vnodeData.routerView) {
        depth++
      }
      ....
      parent = parent.$parent
    }
    // matched是个数组,他里面对应的是一些路由规则,根据深度去拿对应的规则
    const matched = route.matched[depth]
    ...
  }
render (_, { props, children, parent, data }) {
// 标记我是一个routerView组件
data.routerView = true
...
// 标记深度
let depth = 0
...
// 循环,一直往上找,直到头
while (parent && parent._routerRoot !== parent) {
const vnodeData = parent.$vnode ? parent.$vnode.data : {}
if (vnodeData.routerView) {
depth++
}
....
parent = parent.$parent
}
// matched是个数组,他里面对应的是一些路由规则,根据深度去拿对应的规则
const matched = route.matched[depth]
...
}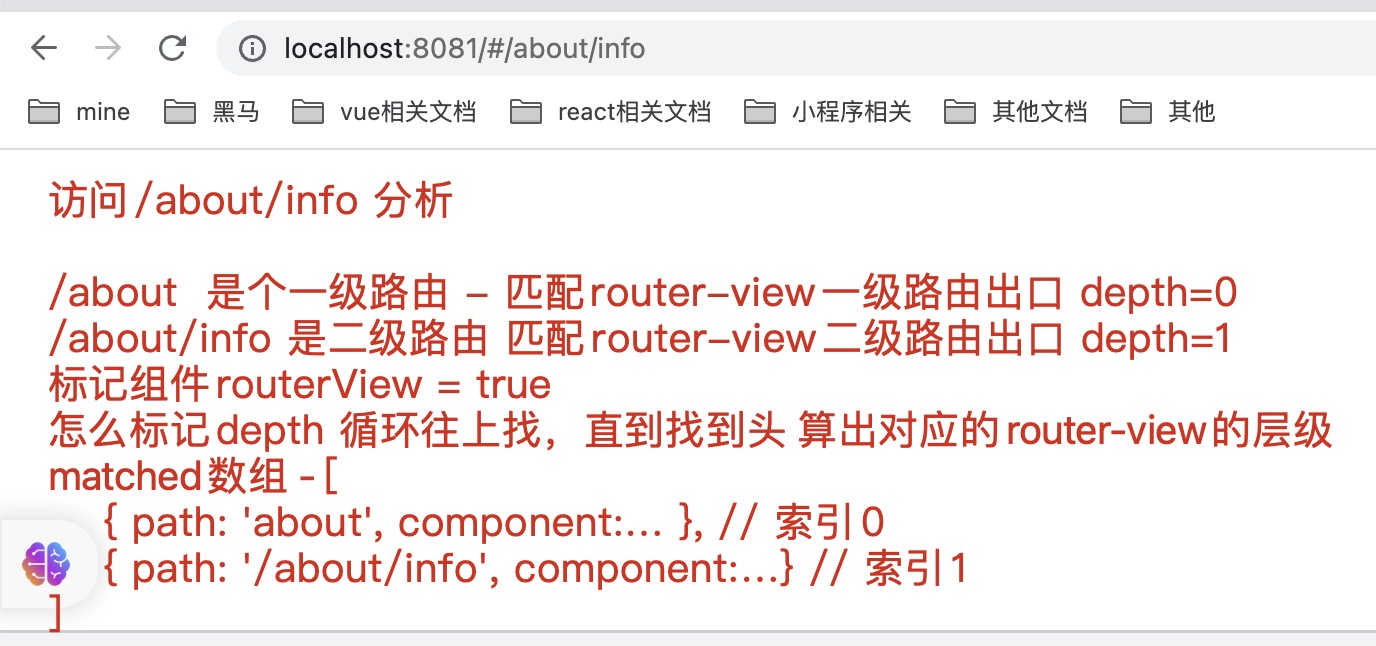
根据源码核心的实现,知道了关键的步骤
- depth处理
- matched数组处理
实现depth
前面根据源码的提示,处理些逻辑,源码由于使用的函数式组件,所以没有this,但我们可以参考他的部分源码,改造成我们想要的数据
      render (h) {
        // 这里的字段对应是根据源码while循环中设置的,其目的就是标记我这个组件是routerView
        this.$vnode.data.routerView = true

        // 标记深度
        let depth = 0

        // 获取父组件
        let parent = this.$parent

        // 循环,一直往上找,直到头
        while (parent) {
          const vnodeData = parent.$vnode ? parent.$vnode.data : {}
          if (vnodeData.routerView) {
            depth++
          }

          parent = parent.$parent
        }
        console.log(depth)
        ...
      }
render (h) {
// 这里的字段对应是根据源码while循环中设置的,其目的就是标记我这个组件是routerView
this.$vnode.data.routerView = true
// 标记深度
let depth = 0
// 获取父组件
let parent = this.$parent
// 循环,一直往上找,直到头
while (parent) {
const vnodeData = parent.$vnode ? parent.$vnode.data : {}
if (vnodeData.routerView) {
depth++
}
parent = parent.$parent
}
console.log(depth)
...
}以上步骤就完成了深度的标记
实现matched
简易实现之将matched处理成响应式的
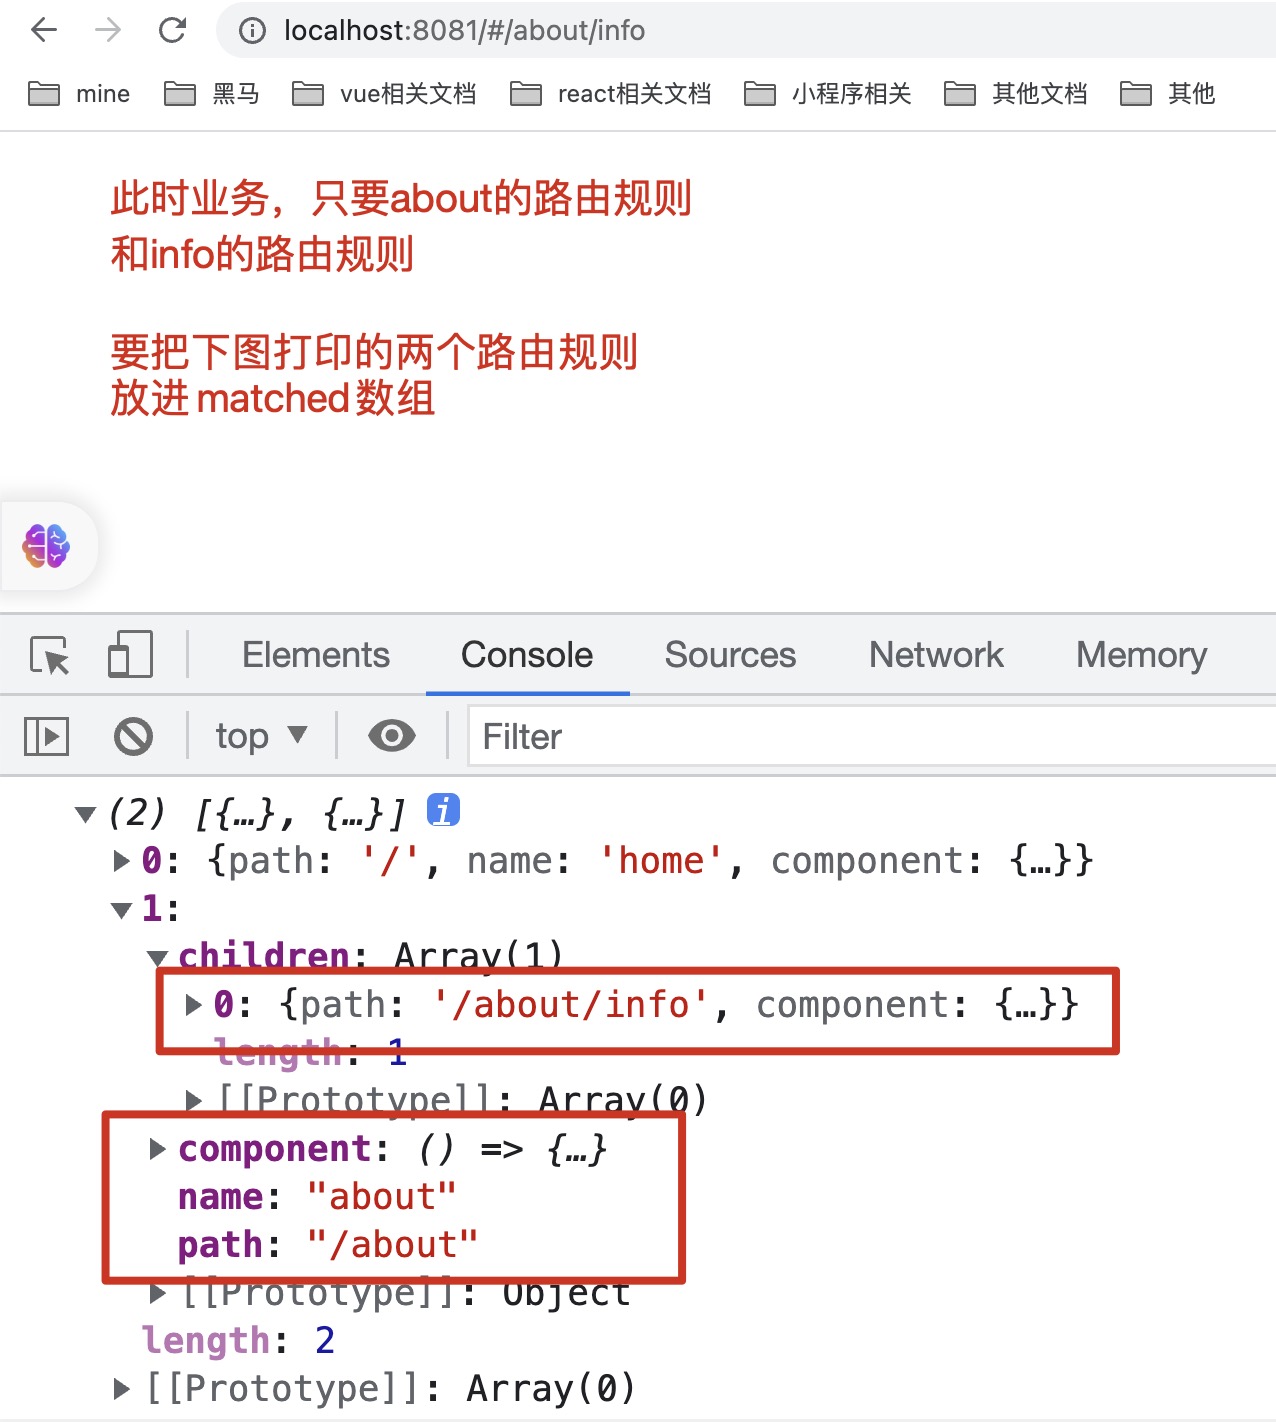
matched是个数组,他用于匹配对应的规则,具体匹配的样子,就和我们之前图片分析的这样,伪代码如下
// 以我们现在的业务举例,一级路由about 二级路由info
[
  {
    path: '/about',
    component: AboutView
  }, // depth 标记是0
  {
    path: '/about/info',
    component: AboutInfo
  } // depth 标记是1
]
// 以我们现在的业务举例,一级路由about 二级路由info
[
{
path: '/about',
component: AboutView
}, // depth 标记是0
{
path: '/about/info',
component: AboutInfo
} // depth 标记是1
]之后将matched处理成响应式的数组,并且添加对应的规则即可,之前的current响应式暂时就用不到了,所以代码如下
    this.current = window.location.hash.slice(1) || '/'
_Vue.util.defineReactive(this, 'matched', []) this.current = window.location.hash.slice(1) || '/'
_Vue.util.defineReactive(this, 'matched', [])matched数组添加对应的规则
如何添加规则,假设另外有一套路由嵌套,比如是playground,对应的matched数组也是类似这样,比如
// 以我们现在的业务举例,一级路由playground 二级路由playgoundA
[
{
path: '/playground',
component: Playground
}, // depth 标记是0
{
path: '/playground/a',
component: PlaygroundA
} // depth 标记是1
// 假设还有更多的层级,也是通过matched[depth]就能获取到对应的路由规则
]// 以我们现在的业务举例,一级路由playground 二级路由playgoundA
[
{
path: '/playground',
component: Playground
}, // depth 标记是0
{
path: '/playground/a',
component: PlaygroundA
} // depth 标记是1
// 假设还有更多的层级,也是通过matched[depth]就能获取到对应的路由规则
]为了凑成这样的结构,我们需要写个方法做递归,因为我们嵌套路由可能很深,children字段是可以一层一层嵌套的,所以新写个方法match处理逻辑
    this.current = window.location.hash.slice(1) || '/'
    _Vue.util.defineReactive(this, 'matched', [])
// 新增调用match方法
this.match()
// 在类中提供match方法
match (routes) {
routes = routes || this.options.routes
console.log(routes)
} this.current = window.location.hash.slice(1) || '/'
_Vue.util.defineReactive(this, 'matched', [])
// 新增调用match方法
this.match()
// 在类中提供match方法
match (routes) {
routes = routes || this.options.routes
console.log(routes)
}先来看下打印,然后分析一波
接着就可以去实现了
  match (routes) {
    routes = routes || this.options.routes
    // console.log(routes)
    for (const route of routes) {
      if (route.path === '/' && this.current === '/') {
        // '/'访问的路径在配置children后,后面的路由规则就没有意义了,所以添加后直接return
        this.matched.push(route)
        return
      }
      // current长这个样子 /about/info
      // route.path /about /about/info
      if (route.path !== '/' && this.current.includes(route.path)) {
        this.matched.push(route)
        // 递归 有孩子要继续添加
        if (route.children) {
          this.match(route.children)
        }
        return
      }
    }
  }
match (routes) {
routes = routes || this.options.routes
// console.log(routes)
for (const route of routes) {
if (route.path === '/' && this.current === '/') {
// '/'访问的路径在配置children后,后面的路由规则就没有意义了,所以添加后直接return
this.matched.push(route)
return
}
// current长这个样子 /about/info
// route.path /about /about/info
if (route.path !== '/' && this.current.includes(route.path)) {
this.matched.push(route)
// 递归 有孩子要继续添加
if (route.children) {
this.match(route.children)
}
return
}
}
}matched数组有了根据depth匹配对应的路由规则
现在数组有了,深度也有了,那就能找到对应的规则渲染
      render (h) {
        ...
        let component = null
        // matched数组 depth深度,获取对应的规则
        const route = this.$router.matched[depth]

        if (route) {
          component = route.component
        }

        return h(component)
      }
render (h) {
...
let component = null
// matched数组 depth深度,获取对应的规则
const route = this.$router.matched[depth]
if (route) {
component = route.component
}
return h(component)
}
hashChange后重置数组和重新调用match匹配规则
切换路由,变更会发现页面组件切换没有效果,原因是没有重置,所以在hashchange里处理重置
    window.addEventListener('hashchange', () => {
      const hash = window.location.hash
      this.current = hash.slice(1)
      // 以下代码是重置xw
      this.matched = []
      this.match()
}) window.addEventListener('hashchange', () => {
const hash = window.location.hash
this.current = hash.slice(1)
// 以下代码是重置xw
this.matched = []
this.match()
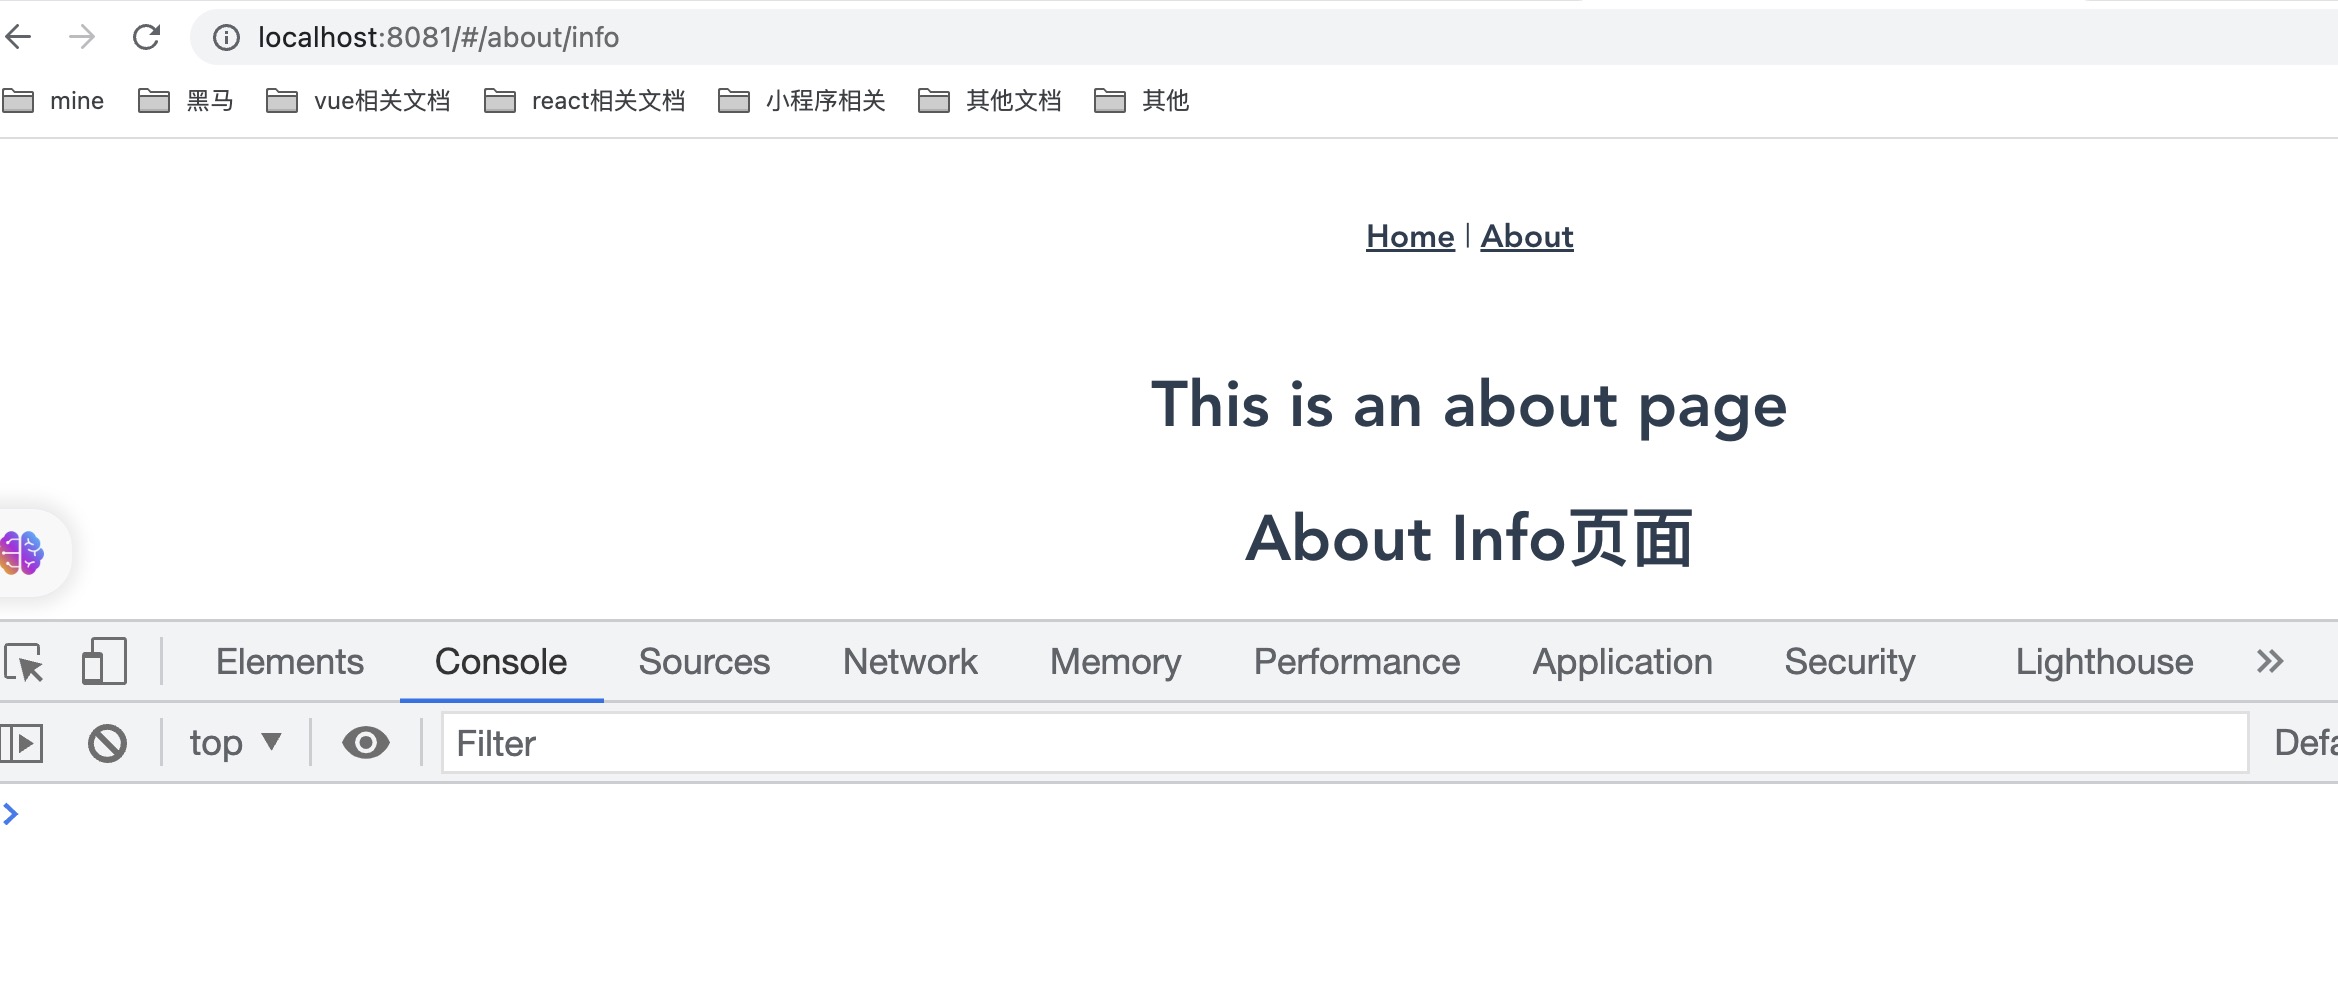
})至此,嵌套路由就已经完成了,具体效果如下
总结
最终代码
let _Vue
class VueRouter {
  constructor (options) {
    // 接收options,里面有routes参数,不信打印下看看?=v=
    this.options = options
    this.current = window.location.hash.slice(1) || '/'
    _Vue.util.defineReactive(this, 'matched', [])
    this.match()
    window.addEventListener('hashchange', () => {
      const hash = window.location.hash
      this.current = hash.slice(1)
      this.matched = []
      this.match()
    })
  }

  match (routes) {
    routes = routes || this.options.routes
    for (const route of routes) {
      if (route.path === '/' && this.current === '/') {
        // /访问的路径在配置children就没有意义
        this.matched.push(route)
        return
      }
      // current长这个样子 /about/info
      // route.path /about /about/info
      if (route.path !== '/' && this.current.includes(route.path)) {
        this.matched.push(route)
        // 递归 有孩子要继续添加
        if (route.children) {
          this.match(route.children)
        }
        return
      }
    }
  }

  static install (Vue) {
    _Vue = Vue
    Vue.mixin({
      beforeCreate () {
        if (this.$options.router) {
          Vue.prototype.$router = this.$options.router
        }
      }
    })
    Vue.component('router-link', {
      props: {
        to: String
      },
      render (h) {
        return h('a', {
          attrs: {
            // 因为是hash模式拼接个#
            href: '#' + this.to
          }
        }, this.$slots.default)
      }
    })
    Vue.component('router-view', {
      render (h) {
        // 标记是routerView组件
        this.$vnode.data.routerView = true
        // 标记深度
        let depth = 0
        let parent = this.$parent
        // 循环,一直往上找,直到头
        while (parent) {
          const vnodeData = parent.$vnode ? parent.$vnode.data : {}
          if (vnodeData.routerView) {
            depth++
          }
          parent = parent.$parent
        }
        let component = null
        const route = this.$router.matched[depth]
        if (route) {
          component = route.component
        }
        return h(component)
      }
    })
  }
}
export default VueRouter
let _Vue
class VueRouter {
constructor (options) {
// 接收options,里面有routes参数,不信打印下看看?=v=
this.options = options
this.current = window.location.hash.slice(1) || '/'
_Vue.util.defineReactive(this, 'matched', [])
this.match()
window.addEventListener('hashchange', () => {
const hash = window.location.hash
this.current = hash.slice(1)
this.matched = []
this.match()
})
}
match (routes) {
routes = routes || this.options.routes
for (const route of routes) {
if (route.path === '/' && this.current === '/') {
// /访问的路径在配置children就没有意义
this.matched.push(route)
return
}
// current长这个样子 /about/info
// route.path /about /about/info
if (route.path !== '/' && this.current.includes(route.path)) {
this.matched.push(route)
// 递归 有孩子要继续添加
if (route.children) {
this.match(route.children)
}
return
}
}
}
static install (Vue) {
_Vue = Vue
Vue.mixin({
beforeCreate () {
if (this.$options.router) {
Vue.prototype.$router = this.$options.router
}
}
})
Vue.component('router-link', {
props: {
to: String
},
render (h) {
return h('a', {
attrs: {
// 因为是hash模式拼接个#
href: '#' + this.to
}
}, this.$slots.default)
}
})
Vue.component('router-view', {
render (h) {
// 标记是routerView组件
this.$vnode.data.routerView = true
// 标记深度
let depth = 0
let parent = this.$parent
// 循环,一直往上找,直到头
while (parent) {
const vnodeData = parent.$vnode ? parent.$vnode.data : {}
if (vnodeData.routerView) {
depth++
}
parent = parent.$parent
}
let component = null
const route = this.$router.matched[depth]
if (route) {
component = route.component
}
return h(component)
}
})
}
}
export default VueRouter水文总结
那今天的水文基本到此结束了,最后做个简单的小结,经过这篇文章的学习,我们手写了个my-router.js,具体细节如下
- 学会使用
_Vue.util.defineReactive- 处理响应式 - 学会使用
hashchange- hash模式核心监听事件 - 如何开发插件 - 需要实现install方法
- 如何拿到router实例 - Vue.mixin中巧妙利用生命周期,根组件这边能拿到router实例
- 全局注册组件使用render函数 - runtime运行时没有编译器,所以只能用render
- 处理path和组件的映射关系 - routes和current处理
- (新增)嵌套路由实现 - matched数组和depth深度